Here’s what you need to do prior to Go Live in the Polaris LEAP system. Logging in, setting up your printer options, and the workforms will help you get up and running for Go Live on August 31st.
If you need help with any aspect of this migration or have general migration questions, please open at ticket at https://support.maineinfonet.org or via email to support@maineinfonet.org.
Login to Leap
Test your Leap logins to ensure you have access. Login to Leap with the username and password provided at training. Hopefully you’ve already had a chance to do this during the trainings, but let us know if you’ve had any trouble logging in or don’t have your username/password. You can submit a ticket at https://support.maineinfonet.org or via email to support@maineinfonet.org.
Setting Up Receipt Printing for Leap
Receipt Printer Configuration
Each receipt printer and workstation will be a little different to configure. You may need your IT person to help out with some of the aspects if your workstations aren’t set to administrative privileges. Please follow the guidance from the Leap help topic.
Manual help topic — https://documentation.iii.com/leap/7.2/Default.htm#LEAP1_0/Receipt_Printer_Configuration.htm
Note: Your printer may use different dimensions, so please adjust accordingly. Refer to your printer manual if you need any model specific guidance.
Print Options in Leap Settings
This step indicates which slips/receipts to print for each function.
- Click the username in the upper right-hand corner of the screen, and then select Settings.
- The Settings page will open to the Print Options tab.
- Select the following recommended options for each section:
|
Check in
|
Check out
|
Patron Status
|
|
ILL requests
|
Hold requests
|
Item record
|
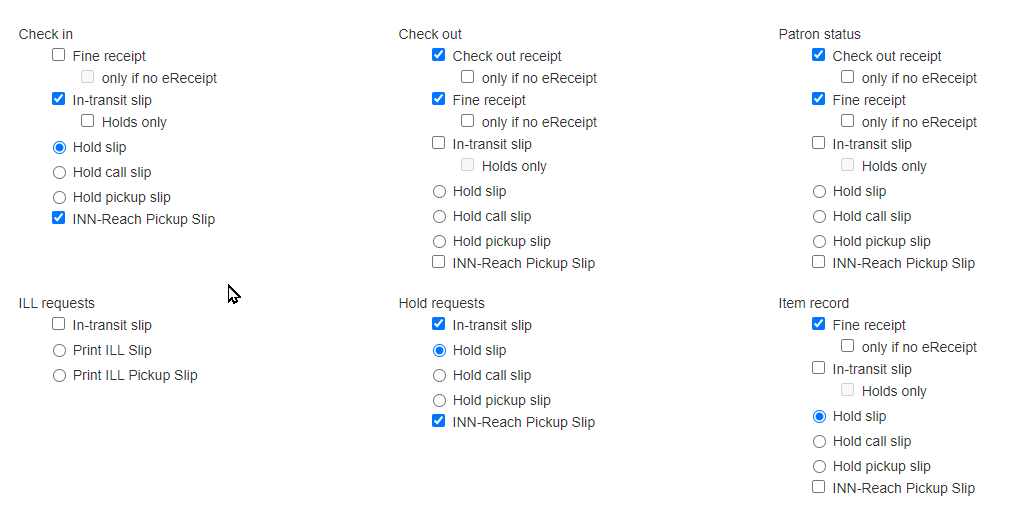
- Click Save and then click the Workform User Defaults tab.
Manual help topic — https://documentation.iii.com/leap/7.2/Default.htm#LEAP1_0/Set_user_print_options_i.htm?Highlight=slip
Workform Default View
- Click the Workform User Defaults tab and make the following changes:
Note: These settings will depend on the workflow of your login, but for circulation the below options are recommended for Go Live.
|
Workform: Default view
|
Request manager: Default status
|
Workform tracker: Recent records
|
Workforms: New Item record:
|
Workforms: New Item record:
|
- Click Save and then click Close.

