The Sierra Cataloging Manual can be found in the following formats for printing purposes:
SIERRA Cataloging Manual – Microsoft Word.docx
SIERRA Cataloging Manual – Adobe .pdf
Table of Contents
| Overview | Overlaying |
| Searching | Spine Labels |
| Record Structure & Data Fields | Suppressing Records |
| Bibliographic Records | Templates |
| Item Records | Macros |
| z39.50 | Shortcuts |
OVERVIEW
Login
- Double click the Sierra icon on your computer desktop.

- Enter your username and password when the Login and Password dialog box appears.
- Click the OK button or hit the Enter key twice.
Customizing Settings, Options and Preferences
Customizing your settings, options and preferences allows you to personalize how Sierra looks and functions. Examples are: font and font size, text colors, record templates, macros, printer templates, sounds and patron display.
Settings
- In the File Menu, choose Admin>Settings.
You will be presented with a list of menu tabs:
| New Records Settings | Claiming/Binding Settings |
| Rapid Update Settings | Statistics Settings |
| Receive Settings | Windows Settings |
| Invoice Settings | Funds Settings |
| Import Invoice Settings | Multi-selection Groups Settings |
| Global Update Settings | Web Options Settings |
| Record Display Settings | Headings Reports Settings |
| Record Templates Settings | Macros Settings |
| Session Statistics Settings | Export Records Settings |
| Create Lists Settings | Search Settings |
| Print Templates Settings |
- Choose the tab that contains the settings you wish to modify.
- Make any necessary changes.
- Select the Save Settings and then the OK
Preferences
- In the File Menu, choose Edit>Preferences.
- You will be presented with a list of menu tabs:
- Editor
- Editor Colors
- Editor Font
Sierra Cataloging Menus and Functions
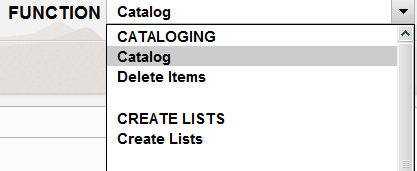
To view the cataloging menu click the Functions drop-down menu arrow. Under the Cataloging Function select the mode that you wish to work within. You may also access this from the File Menu. Select Go>Catalog and choose the mode that you wish to work within.
Searching
- From the Functions menu in the upper right of the screen, select Catalog.
- Change the Search Index drop-down menu to the correct index (Title, Barcode, ISBN, etc.)
- Type or scan the item barcode, title, or ISBN into the Search box.
Select Enter on the keyboard or click the Search button.
Bibliographic Record Search
View
- If you receive a results list, click on the title of the record to open.
- If there is an additional list of titles under the primary, select the one that applies to your search. Then refer to the following possibilities for the next step.
- If you are taken to the item record, select the View or Edit icon to navigate to the bibliographic record.
- If you are taken to the Summary screen, select the View or Edit icon to navigate to the bibliographic record.
- If you are immediately taken to the bibliographic record, proceed as normal.
Item Record Search
View
- If you receive a results list, click on the title of the record to open.
- If there is an additional list of titles under the primary, select the one that applies to your search. Then refer to the following possibilities for the next step.
- If you are taken to the bibliographic record, select the Summary icon to go to the Summary screen. Change the View to the correct menu in the drop-down list. Then double-click on the record you are looking for.
- If you are taken to the Summary screen, change the View to the correct menu in the drop-down list. Then double-click on the record you are looking for.
- If you are immediately taken to the item record, proceed as normal.
Sort
When in the Item view of the Summary screen, you can sort the list of records by clicking on the column header to sort the list by that parameter.
Record Structure and Data Fields
From within a bibliographic or item record, you will notice in the first half of the screen fields that the system provides you with options to choose from. These fields are called fixed-fields because the system only allows preset information in these fields.
The lower half of the screen contains variable-length fields. This area of the record contains information that can be edited by staff. The addition of information in this section is as simple as selecting the Insert icon and choosing a field tag to insert, or placing your cursor at the end of a field and hitting the Enter key. Then you can input any pertinent information for that record.
Bibliographic Records
Structure
Bibliographic Record Example
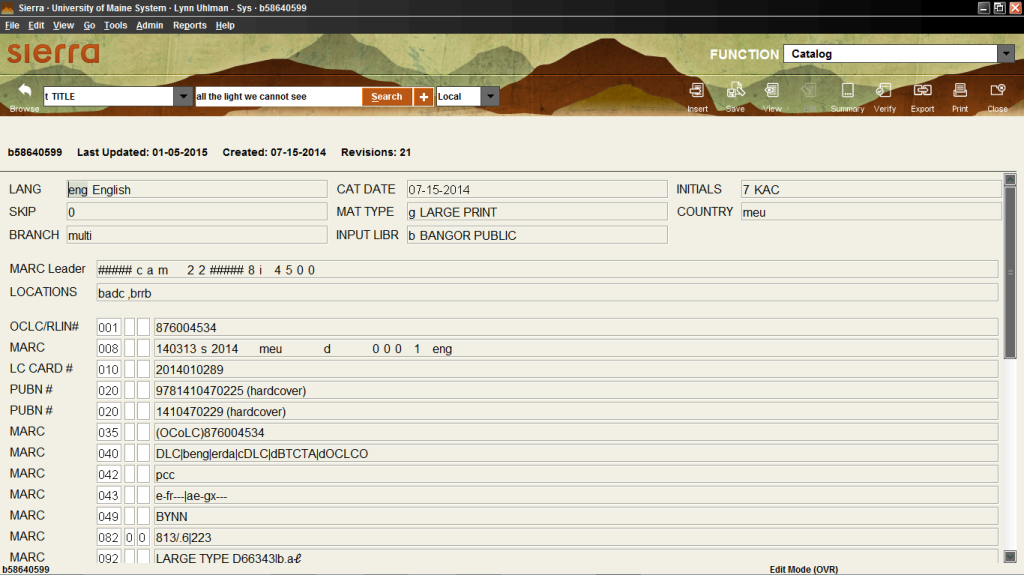
The top half of the screen contains fixed-length fields, which have pre-configured codes or system information. The lower half of the screen contains the variable-length fields which you can add to or modify.
Fixed-Field Descriptions
LANG – The language of the material being cataloged.
SKIP – The number of characters to skip when sorting based on the Title field.
BRANCH – Bibliographic location code indicates the branch that has this material.
CAT DATE – Date the material was cataloged.
MATTYPE – Format of the material.
INPUT LIBR – Local consortium field that was used to identify the library cataloging the material.
INITIALS – Similar situation as the INPUT LIBR. Also, used to suppress bibliographic records from the OPAC display.
COUNTRY – The country the material was published.
Creating an Original Bibliographic Record
- Select Catalog from the Function drop-down menu.
- In the icon menu, select New.
- Choose a template from the Select Template list.
- Follow the template wizard prompts until it returns to the New BIBLIOGRAPHIC record or moves on to the New Item Options screen (individual settings can alter the next step).
a. If it brings you back to the New BIBLIOGRAPHIC record, verify that everything is correct and then click the Save icon. Then move on to creating the item record by following the directions under Creating or attaching new Item records.
b. If it brings you to the New Item Options screen, go directly to Creating or attaching new Item records and follow the directions there.
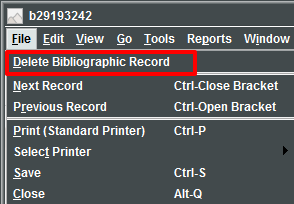
Deleting a Bibliographic Record
- Select Catalog from the Function drop-down menu.
- Search for and open the record.
- Verify the Edit icon is selected. It will be grayed out and will say Edit Mode (OVR) at the bottom of the screen.
- Select File and then Delete Bibliographic Record.
Item Records
Structure
Item Record Example
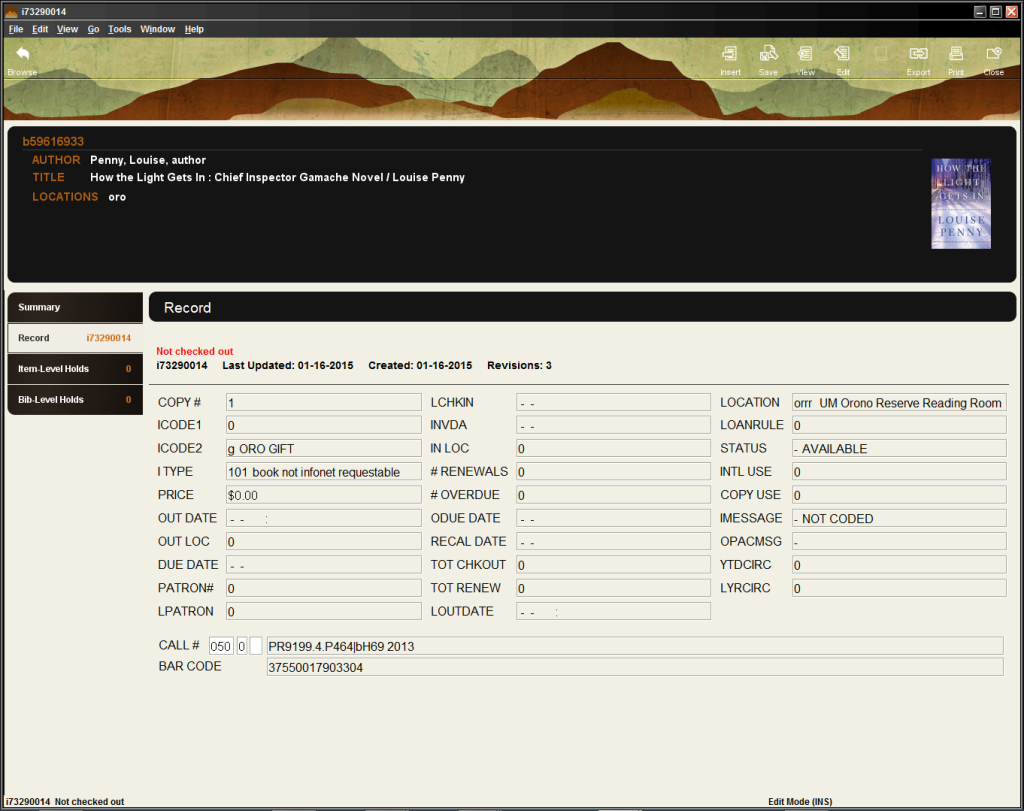
The top half of the record contains fixed-length fields, which have pre-configured codes or system information. The bottom half contains variable-length fields, such as call # and barcode.
Fixed-Field Descriptions
COPY# – Number of the copy owned by library.
ICODE1 – Commonly used as statistical category fields. Not currently used.
ICODE2 – Commonly used as statistical category fields, such as Withdrawn, Suppress, or Non-Contribute.
ITYPE – The type of item. Used to define groups of items that may circulate differently.
PRICE – Contains the price of the item
OUT DATE – The date and time that the item was checked out.
OUT LOC – Records the statistics group number associated with the user who checked out or renewed the item.
DUE DATE – The date the item is due.
PATRON# – The record number of the patron who has the item checked out (displayed without the last digit, the check digit). ‘0’ if the item is not checked out.
LPATRON – The record number of the last patron to check out the item (displayed without the last digit, the check digit).
LCHKIN – The date recorded in the item record when the item was last checked in from a patron.
INVDA – The date the item was inventoried and found on the shelf.
IN LOC – Records the statistics group number associated with the user who checked in the item. This field is updated when a check in unlinks the item record from the patron record.
# RENEWALS – The number of times the item has been renewed by the patron who currently has the item checked out
# OVERDUE – The level of the last overdue letter sent to the patron who has the item checked out.
ODUE DATE – The date of the last overdue letter sent to the patron.
RECAL DATE – The date the item was recalled (blank if the item has not been recalled).
TOT CHCKOUT – Incremented by the system each time the item is checked out
TOT RENEW – Total number of times the item has been renewed.
LOANRULE – The loan rule number (from the Loan Rule table) under which the item is currently checked out. ‘0’ if the item is not checked out.
LOCATION – Location codes can represent distinct physical locations (for example, branches of the library) or different areas within the same physical location (for example, a department, a collection, or a shelf). An item’s location determines its schedule and the loan rules that apply to the item.
STATUS – Explains the current condition of an item, whether it is available, missing, lost, billed, etc.
INTL USE– The number of times the item has been used inside the library.
COPY USE– The number of times the item has been used for photocopying
IMESSAGE – A system message that provides pertinent information regarding the item. The message appears in the summary list when the item is checked in or out.
OPACMSG – A system message that provides pertinent information regarding the item. The message appears in the OPAC.
YTD CIRC– The number of times the item has been checked out during the current statistical period.
LY CIRC– The number of times the item was checked out during the last statistical period.
Creating or attaching new Item records
Single copy
- Search for the bibliographic record using the methods discussed under Searching.
- Once you have found the bibliographic record you wish to attach to, select the Summary icon.
- Ensure that the drop-down View menu is set to Item.
- Then select Attach New Item.
- Verify that Single Item is selected and click OK.
- Choose the applicable template.
- The template wizard will appear prompting select fields. Enter in the information as you are prompted and click Next. To view field options, double-click the field box. If a mistake has been made, finish entering information into the template prompts and then correct any errors.
- Save the record by clicking on the Save icon.
- Close the record by either: clicking on the Close icon, Alt+Q, or selecting File>Close.
Multiple copies
- Search for the bibliographic record using the methods discussed under Searching.
- Once you have found the bibliographic record you wish to attach to, select the Summary icon.
- Ensure that the drop-down View menu is set to Item.
- Then select Attach New Item.
- Select Multiple Items.
- Enter the Location by selecting the arrow in the drop-down menu and clicking on the location.
- Enter in the # of Copies.
- Review the New Items pop-up dialog box. Select Yes to accept or No to go back.
- Select the appropriate template for the items in hand.
- The template wizard will appear prompting select fields. Enter in the pertinent information and click Next. To view field options, double-click the field box. If a mistake has been made, finish entering information into the template prompts and then correct any errors.
- Save the record by clicking on the Save icon.
- Close the record by either: clicking the Close icon, Alt+Q, or selecting File>Close.
Editing Item records
Search for the item record using the methods discussed under Searching.
Edit the record by:
- Fixed-fields: Double-click to change the field information. –OR–
- Variable fields:
a. Place your cursor in an existing field and enter or delete information.
b. Select the Insert icon, choose a field from the drop-down menu and enter in the pertinent information.
c. Place your cursor in an existing field and click Alt+D to delete the field or right-click and select Delete Field.
Deleting Item records
- Search for the item record using the methods discussed under Searching.
- In the item record, go to the File menu and select File>Delete Item Record.
- A Delete Record(s) pop-up dialog box will appear. Select Yes to delete the record or No to return to the item record.
- Close the record by either: clicking the Close icon, Alt+Q, or selecting File>Close.
Deleting last attached item from bibliographic record
- Search for the item record using the methods discussed under Searching.
- In the item record, go to the File menu and select File>Delete Item Record.
- A Delete Record(s) pop-up dialog box will appear. If it is the last item attached to the bibliographic record you will see the following message.
- Select the checkbox next to Delete Bibliographic record.
- Select Yes to delete the record or No to return to the item record.
Close the record by either: clicking the Close icon, Alt+Q, or selecting File>Close.
Z39.50
Searching
- After verifying that the record doesn’t exist in the system, select the drop-down menu next to the Search button and choose Remote.
- On the Select Databases screen, choose the databases to search by clicking on the checkbox next to its name.
- Click OK.
- Select the search index (i.e. Title, ISBN, Author, etc.) and enter the corresponding information.
- Select Search.
- The Searching Remote Databases pop-up dialog box will appear. When done, select Close.
Review the Results list by double-clicking on the record name. - After reviewing the list and having found a bib record that matches, insert your bib location into the Location field box by double clicking on it.
- You can start typing your bib branch once the Edit Data pop-up dialog box appears, or double-click on the —– line and find your bib branch from the list.
- Review the bib record for any deletions or additions that may be necessary.
- Click the Save icon.
Overlaying
Overlaying can be done through a manual process within the system or by using another vendor’s software that utilizes the load profiles within Sierra. The manual process options are outlined below:
Option #1 – Search z39.50 first
- The first option is to search z39.50 (refer to Z39.50 for directions)
- Find a matching record and then go to Edit>Overlay>Find Bib.
Option #2 – Search for existing record first
- Find an existing record in the system, leave it open but minimize the screen.
- Then search z39.50 for a better record. (refer to Z39.50 for directions)
- Go to Edit>Overlay>(select the bib record # of the open record).
- Select Save and Close.
Spine Labels
- Go to the item record, select Tools from the File menu.
- Next, select Print Monographic Label.
- The right dialog box will appear.
- Click the Print button.
- Next, a printer dialog box appears. Double-click on Local Printer to select your Label Printer.
- Once you have selected the correct printer, click the Print button.
Suppressing Records
Bibliographic Records
To suppress a bibliographic records, simply go to the record and double-click on Initials in the fixed-fields. Select n-SUPRESS and hit OK. Save the record.
Item Records
To suppress an item record, simply go into the item record and double-click on icode2 in the fixed-fields. Select n-SUPRESSION and hit OK. Save the record.
Templates
Templates are used to create consistent looking records and to stream-line the record creation process. Once these templates are created and added to the users’ preferred templates list, the user can then select a template from the list prompt when creating a new record for item or bibliographic record. A staff member who has permissions may create, edit or delete templates by going to Admin in the File menu and selecting Settings. From there choose the Record Templates tab.
Creating a template
- Change the Record Type drop-down menu to the type of template you wish to create.
- Select the New button
- In the Template Code/Description pop-up dialog box, enter in a code and a description (i.e. orobib Orono bib record).
- Select any fixed-fields that are going to contain standard information for that type of record template by double clicking on the field box and choosing from the selection.
- To insert variable-field information:
- Select the Insert icon
- Choose a field to insert by clicking on the drop-down menu and selecting a field.
- Click OK.
Setting fields to prompt:
**Please note that Fixed-fields will always prompt before variable-fields.
Fixed-fields
Select the field and click on the Prompt button. Adjust the order as needed by using the Move Up and Move Down buttons to the right of the display screen.
Variable-fields
Select the field and click on the Prompt button. These fields will be prompted in order as they appear in the record.
Editing a record template
- Go to Admin>Settings>Record Templates.
- Select the Record Store Type.
- Choose the record in your preferred template list that needs edited by double-clicking on it, or by highlighting it and then clicking on the Edit button.
- To delete a variable-field, place your cursor in the field and hit the delete key on your keyboard, or hit Ctrl+D.
- To insert a variable-field, select the Insert icon and choose a field by clicking on the drop-down menu and selecting the field.
- To change a fixed-field, double-click on the field and choose from the selection and click OK.
Macros
Macro Settings
The Macros tab allows you to customize your keyboard function keys. The system offers the ability to customize function keys F1 through F12, plus these same function keys in combination with Alt, Ctrl, and Shift, e.g., Alt+F1, Ctrl+F1, Shift+F1, etc. If you have customized your function keys by using macros, you can press the function key or function key combination to activate the macro. For example, if you set F10 to “|e author,” then you could key F10 after an author’s name in the 100 field instead of keying the subfield every time.
Customizing Function Keys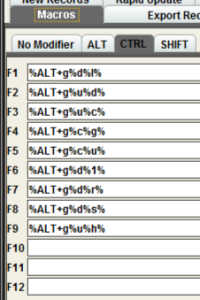
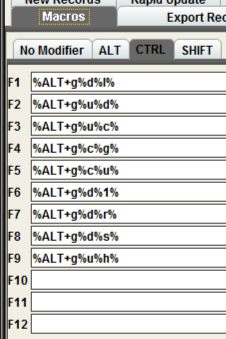
Each login can create its own function key settings. To customize the function keys for a login:
- Select Settings from the Admin
- Click the Macros tab in the dialog that displays
- Select one of the following tabs depending on which keys you want to customize:
- No Modifier – to customize function keys F1 through F12
- ALT – to customize function key combinations Alt+F1 through Alt+F12
- CTRL – to customize function key combinations Ctrl+F1 through Ctrl+F12
- SHIFT – to customize function key combinations Shift+F1 through Shift+F12
- Click in the text box for the function key you want to modify. Note that the system designates a particular function key as “RESERVED” if it is unavailable for customization.
Entering Text in a Macro
To enter text for a macro, key the text. Note that the Macros tab is case-sensitive (i.e., it distinguishes between capital and lowercase letters). If you want a capital ‘G’, for example, make sure you enter ‘G’ and not ‘g’.
For example, key “Journal of ” (without quotation marks) in the F10 text box to associate the F10 function key with that string of text. Then, in a search screen, keying F10 will automatically enter “Journal of ” (without quotation marks) in the search text box.
Entering Diacritics in a Macro
To enter a diacritic mark as a macro, you will need to hold down the Alt key and then press the sequence of numbers associated with the diacritic mark.
Examples of Diacritic Keyboard Codes
| Grave | |||||
| À | 0192 | È | 0200 | Ì | 0204 |
| Ò | 0210 | Ù | 0217 | ||
| à | 0224 | è | 0232 | ì | 0236 |
| ò | 0242 | ù | 0249 | ||
| Acute | |||||
| Á | 0193 | É | 0201 | Í | 0205 |
| Ó | 0211 | Ú | 0218 | Ý | 0221 |
| á | 0225 | é | 0233 | í | 0237 |
| ó | 0243 | ú | 0250 | ý | 0253 |
| Circumflex | |||||
| Â | 0194 | Ê | 0202 | Î | 0206 |
| Ô | 0212 | Û | 0219 | ||
| â | 0226 | ê | 0234 | î | 0238 |
| ô | 0244 | û | 0251 | ||
| Tilde | |||||
| Ã | 0195 | Ñ | 0209 | Õ | 0213 |
| ã | 0227 | ñ | 0241 | õ | 0245 |
| Umlaut | |||||
| Ä | 0196 | Ë | 0203 | Ï | 0207 |
| Ö | 0214 | Ü | 0220 | Ÿ | 0159 |
| ä | 0228 | ë | 0235 | ï | 0239 |
| ö | 0246 | ü | 0252 | ÿ | 0255 |
| Punctuation | |||||
| Copyright symbol | 0169 | Dagger | 0134 | ||
| Registered symbol | 0174 | Double Dagger | 0135 | ||
| List Dot | 0149 | en-dash | 0150 | ||
| Section Symbol | 0167 | em-dash | 0151 | ||
To enter non-alphanumeric keys for a macro
- Type the keyboard code for the key (see the List of Keyboard Codes below), or
- Right-click the Macros tab, and choose the key from the popup menu. Note that you can use only the non-alphanumeric characters listed in the popup menu; the system does not recognize other non-alphanumeric keys.
- Choose Save Settings to save the macro changes you have made. You can also choose Reset at any time to clear any unsaved changes, i.e., any changes made before choosing the Save Settings
- Choose OK to exit the dialog. Choose Cancel to exit the dialog without saving any of your changes.
Examples of non-alphanumeric keys for a macro
| Keyboard Code | Corresponding Key Combination |
| %HOME% | Home |
| %END% | End |
| %LEFT% | LeftArrow |
| %RIGHT% | RightArrow |
| %UP% | UpArrow |
| %DOWN% | DownArrow |
| %TAB% | Tab |
| Keyboard Code(cont.) | Corresponding Key Combination |
| %PGUP% | Page Up |
| %PGDOWN% | Page Down |
| %ENTER% | Enter |
| %ALT+<another key>% | ALT+<another key> |
| %CTRL+<another key>% | CTRL+<another key> |
| %SHIFT+<another key>% | SHIFT+<another key> |
Note: “<another key>” stands for any other alphanumeric or non-alphanumeric key you may enter, e.g., “%CTRL+t%,” “%ALT+Left%”, “%CTRL+SHIFT+t%”.
The system also uses the plus sign ‘+’ for non-alphanumeric/alphanumeric key combinations. For example, “%CTRL+a%” corresponds to Ctrl+A which selects all the items in a table. Note that the ‘a’ is inside the percent signs to signify that the ‘a’ is keyed while the Ctrl key is depressed. Be careful not to place extra letters inside the percent signs, unless this is what you intend.
For example, to change modes to Search/Holds by Title, you key Alt+G and then press U and H. To make this key combination into a macro, enter “%ALT+g%u%h%” in the function key text box (note that F3 is predefined with this key combination). Or, to make a macro that automatically searches for the title string “journal of”, enter “tJournal of%ENTER%” in one of the function key text boxes.
| Cataloging | Macro | |
| Catalog | %ALT+g%c%g% | |
| Delete Items | %ALT+g%c%d% | |
| Global Update | %ALT+g%c%u% | |
| Headings Report | %ALT+g%c%h% | |
| URL Checker | %ALT+g%c%k% | |
| Tools | Macro | Available in… |
| Search | %ALT+t%s% | Cat & Circ |
| Browse Query | %ALT+t%b% | Cat |
| Limit | %ALT+t%m% | Cat & Circ |
| Notice History | %ALT+t%n% | Circ |
| Admin>Parameters | Macro | |
| Days Closed | %ALT+a%p%i%d% | |
| Hours Open | %ALT+a%p%i%o% | |
| Loan Rule Determiner | %ALT+a%p%i%u% | |
| Loan Rules | %ALT+a%p%i%r% | |
| Statistical Group Maintenance | %ALT+a%p%i%i% | |
| Branches | %ALT+a%p%g%b% | |
| Item Types | %ALT+a%p%g%i% | |
| Patron Blocks | %ALT+a%p%g%n% | |
| Patron Type | %ALT+a%p%g%p% | |
| Administration | Macro | |
| Global Update | %ALT+g%c%u% | |
| Delete Records | %ALT+g%d%1% | |
| Rapid Update | %ALT+g%d%r% | |
| Create Lists | %ALT+g%d%l% | |
| Data Exchange | %ALT+g%d%d% | |
| Statistics | %ALT+g%d%t% | |
| Web Master | %ALT+g%d%b% | |
| Web Options | %ALT+g%d%w% |
Summary of Rules for Keying Macros
The following rules apply when keying macros:
- Macros use alphanumeric keys, non-alphanumeric keys, and text strings in any combination.
- Macros are case-sensitive.
- Spaces are allowed in text strings.
- Keyboard codes are all uppercase.
- Keyboard codes must be enclosed in percent signs.
- To represent alphanumeric and non-alphanumeric keys pressed simultaneously, enclose the letter or number and the keyboard code in percent signs.
- Use the plus sign ‘+’ to separate keys in a macro.
- Text strings are not separated from alphanumeric or non-alphanumeric keys by plus signs or other markers.
- Macros cannot change the active screen element (i.e., macro elements cannot apply to separate boxes or dialogs).
Shortcuts
Shortcut Keys
Common to all Sierra applications:
| Key Combination | Function |
| Alt+Home | Open the index search drop-down list. |
| Alt+LeftArrow | View the previous month in a date dialog |
| Alt+Q | Close the current record |
| Alt+RightArrow | View the next month in a date dialog |
| Ctrl+Enter | Add an extra line to a variable-length field with multiple lines, e.g., an ADDRESS field or the multi-field LOCATION/COPIES editor |
| Ctrl+=+. | View the previous attached record |
| Ctrl+=+, | View the next attached record |
| Ctrl+]+- | Display the next record in a browse list |
| Ctrl+[+- | Display the previous record in a browse list |
| Ctrl+Shift+P | Displays the full patron record when in Circulation Desk Display |
| Ctrl+C | Copy selected text or the current text field |
| Ctrl+N | Creates a new record |
| Ctrl+T | Move forward from one tab to another in a bibliographic record display |
| Ctrl+V | Paste the contents of the Windows clipboard |
| Ctrl+X | Cut the selected text and copy it to the Windows clipboard |
| Ctrl+Y | Redo the most recent undo action |
| Ctrl+Z | Undo your last action |
| Esc | Clears a browse display |
| N | Choose the No button in message dialogs; you can also key Alt+N |
| Y | Choose the Yes button in message dialogs; you can also key Alt+Y |
| Space | Select a button or check box |
| Tab (or Shift+Tab) | Make a button, check box, drop down list, etc.the active screen element |
Search Shortcuts
As a shortcut, rather than click the Search button, you can use the barcode entry box by preceding search words with a single character indicating the type of search, e.g. “tHarry Potter and the Goblet of Fire”, “aGrisham, John” for author John Grisham, or “pSmith, John” for patron John Smith, “dCross-country skiing” for subject “Cross-country skiing”. Commas are optional and are treated as spaces.
Slow System Response
If the system slows down momentarily, resist the temptation to hit keys or mouse buttons repeatedly, as this can confuse or destabilize the program. If the system remains slow, try exiting Sierra and then re-opening it. This sometimes helps.


