Print Templates are used to assign customized notices, receipts and slips to a user account. These templates allow customization of the layout and design of notices, receipts and slips to better serve patrons and assist library staff. Creating and editing them, however, requires a third-party software which III does not support, so care is needed when making them. Additionally, assigning use of the modified templates for slips and notices can only be done per user account and cannot be batched to all users.
Using Print Templates
To use Print Templates, please have Maine InfoNet staff enable the use of a print template for the particular notice or slip type. Once the Print Templates have been enabled for the user account and the first time you login once the change has been made, you will need to set your default printer for the Print Template notice or slip type. You will be prompted for each new print template used to select the default printer to use with them.
Holdshelf and Transit Slip 1st Time Steps
***Holdshelf and Transit Slip Print Templates will only work on receipt printers. If you do not use a receipt printer, then please submit a ticket to Maine InfoNet Support Center and we will reset your slips to the system default.***
- A dialog Message box will appear asking to print the holdshelf or transit slip. Select Yes.
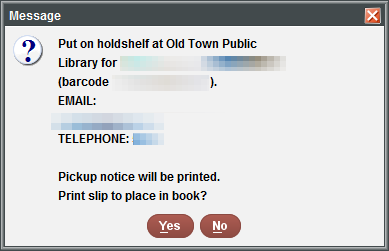
Figure 1–Put on holdshelf at Old Town Public Library for [patron name, patron record #, barcode, email, telephone] Pickup notice will be printed. Print slip to place in book?
- Another dialog box will appear. Select your receipt printer from the drop-down menu.

Figure 2 — Select your receipt printer and select the checkbox next to “Save this printer selection.” in the dialog box.
- Select the checkbox next to “Save this printer selection.” This should retain the printer selection for this particular print template document.
- Click Print.
Sierra should now retain the Print Template printer settings for this workstation.
Print Templates using the wrong printer or not printing at all
If the slip or notice is using an incorrect printer, follow the steps below to resolve.
- Go to the file menu and select File>Select Printer>Print Templates.
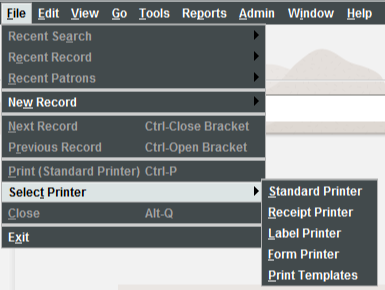
Figure 3 – Go to the file menu and select File>Select Printer>Print Templates
- In the Select Print Templates dialog box, navigate to the slip or notice type in the Select output type drop-down menu.
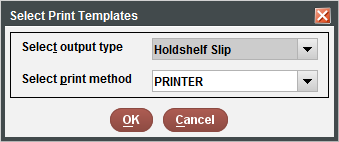
Figure 4 – The Print Templates dialog box, navigate to the slip or notice type in the Select output type drop-down menu.
- Leave the Select print method set to PRINTER.
- Click the OK button.
- A screen similar to below will appear, but the Name of the job will change depending on the type of slip or notice you chose.
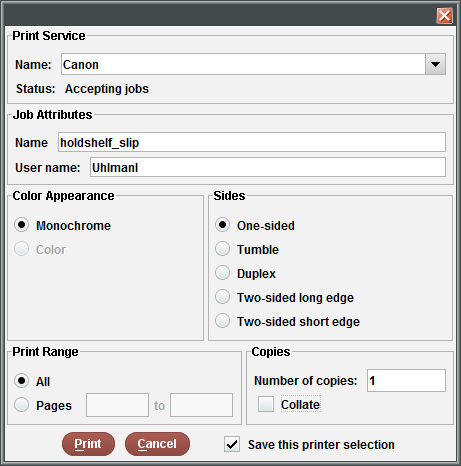
Figure 5 – Select your receipt printer and select the checkbox next to “Save this printer selection.” in the dialog box.
- Make sure under Print Service the Name drop-down menu is set to the correct printer.
- At the bottom of this screen is a checkbox next to Save this printer selection. Select it.
- Click Print.


